Pentest Home Lab - 0x2 - Building Your AD Lab on Premises
In Pentest Home Lab - 0x0 - Building a virtual corporate domain, we talked about why you would want to build your own AD pentest lab, where you can build it, and the pros and cons of each option.
In Pentest Home Lab - 0x1 - Building Your AD Lab on AWS, we walked through setting up a fully functional home lab in AWS.

You will create at least 2 users and 1 administrator account:

2013 configuration
CPU: AMD FX-Series 8-Core (Circa 2013)
SSD: 512 GB SSD

5) Select I agree
6) Pick harddisk and select Next
7) Select Country, Time zone, and Keyboard Layout and select Next
8) Select a password and enter your email address (I have not gotten any email from them)
9) Configure management network interface and select Next

10) Select Next. This will begin the install
11) Click Reboot
12) At the console, you should see something like this:

13) Log into the console and update the OS:
15) Navigate to the IP you gave your PVE (https://IP:8006)


1) Click this link: https://www.microsoft.com/en-us/software-download/windows10
2) Click Download tool now

3) Run the tool
4) Click Accept

5) Click Create installation media

6) Click Next
7) Stick with defaults and click Next

8) Click ISO file
9) Save the ISO (The default filename is windows.iso. I suggest renaming it to Win10Eval.iso or something)
2) At the top right, click Create VM

3) General: Enter ID and Name and click next

4) OS: Select your OS (Microsoft Windows 8.x/Server 2012r2) and click next

5) Storage: Select local, and then your transferred ISOs should show up in that list. Select the correct windows server 2012 ISO and click next

6) Hard Disk: Click next
7) CPU: Click next
8) Memory: I liked to select Automatically allocate memory within this range, and for Windows I tell it to stay between 1 and 4GB. You can certainly tweak these based on how much RAM you have. 9) Click next

10) Network: Keep defaults (Bridged mode), and click next
11) Click finish
12) In the right side column, find and right click the newly created instance. Click start

13) One column over, click Console
At this point, we are just installing Windows Server 2012r2 as we would normally. I'm going to keep it simple with some bulleted instructions and some commentary, but if you are looking for a similar post that has some nice looking pictures to go with these steps, check out the following series (Parts 1-3): https://www.psattack.com/articles/20160718/setting-up-an-active-directory-lab-part-1/
Time/Sanity Saving Tip: I used to spend hours updating all of my virtual machines before I would make a snapshot or template, but eventually I realized that it was mostly a waste of time. Sure, there are a few times where you do want to test your tools against a fully patched box. But, if this is your first pentest lab, I suggest learning from my hours of wasted time and skipping the patches until you need them. This applies to both the servers and the desktops.
3) Accept Default settings and click Next
4) Click Install Now
5) Select Windows Server 2012 R2 Standard (server with a GUI)
6)Accept the license terms and click Next
7) Select Custom - New Installation
8) Highlight Drive0 unallocated space
9) Click Next
10) Create an admin password. Use something you don't mind other people seeing, as you might share stuff from this lab one day ;)
11) Use the proxmox shortcut icon to enter Ctrl+Alt+Delete, and log in:

13) Do anything else you need to do on this VM before you convert it to a template. For instance, if you are not using a Eval license, you will want to run sysprep on the VM before you turn it into a template.


3) Next, Next, Next
4) Select Active Directory Domain Services
5) Select Add Features
6) Select DNS Server
7) Select Add Features
8) Next, Next, Next, Next
9) Select Restart the destination server automatically if required
10) Yes, Install, Close
11) In server manager, you will see a yellow caution triangle. Click it,
12) Click promote this server to a domain controller
13) Add new forest
14) Name your domain: you can do lab.local for now, or you can make room for more domains in the future with something like lab.proxmox.local.
15) Click Next
16) Create and record the DSRM password
17) Click Next (ignore warning), Next, Next, Next, Install
18) You will see: You are about to be signed out.
19) Click close (or just hang tight)

2) Start the server and add it to the domain
1) RDP to server
2) Right click on the networking icon at the bottom left and click Open Network and Sharing Center
3) Select Ethernet Adapter
4) Change the primary DNS server to be the IP address of your DC
1) Select the folder icon in the task bar
2) Right click This PC
3) Click Properties
4) Under Computer name, domain, and workgroup settings, click Change settings
5) Click Change
6) Give your machine a better hostname: Workstation01
7) Switch from Workgroup to Domain and specify the domain. For example, aws.local
8) Click OK
9) Enter Domain Admin credentials. Go ahead and use Admin1's credentials.
10) Once your machine has been added, click OK twice
11) Close the window, and go ahead and Restart Now
12) Repeat this for all servers
Having trouble adding your host to the domain? Here are some troubleshooting tips:
1) Can you ping the IP address of your DC from your other server(s)?
2) Can you resolve the hostname of your DC from your other server(s)?
3) Can you navigate to \\IP_ADDRESS_OF_DC from your other server(s)?
Here are things to look for:
Network Config Settings
--- Did you give your DC the right subnet mask when you configured the static IP?
--- Did you configure the primary DNS server properly on your non-DC host?
Are you typing in the right domain name when attempting to add your host?
In Pentest Home Lab - 0x1 - Building Your AD Lab on AWS, we walked through setting up a fully functional home lab in AWS.
In this third installment, I'm going to walk through setting up a pentest active directory home lab in your basement, closet, etc. I'll be using Proxmox VE, an open source virtualization environment (aka hypervisor) similar to Vmware ESXi or Citrix XEN.
The series so far:
Table of Contents
- What are we going to build?
- Example server specs
- Let's talk about network placement
- Installing the hypervisor (Proxmox VE)
- Getting Windows server software
- Obtaining evaluation version of Windows server
- Downloading Windows 10 ISO
- Transfering ISOs to Proxmox
- VM #1: Creating our Server 2012r2 template
- Configuring a Proxmox VM (Windows server 2012r2)
- Installing Windows Server 2012r2
- Converting a VM to a template in Proxmox
- VM #2: Creating your 2012r2 domain controller
- Creating a new VM by cloning your template
- Promoting your first server to a DC
- You now have an Active Directory Domain - Add some users
- Add at least one admin user to your domain admins group
- VM #3: Creating your second 2012r2 server
- Configuring DNS
- Adding host to the domain
- Adding domain users to the remote desktop group
- VM #4: Creating our Windows 10 Template
- VMs #5 & #6: Creating two Windows 10 VMs from the template
What are we going to build?
At the end of this post, you will have a fully functional AD environment running on ProxmoxVE that you can use to make yourself a better penetration tester. I'm not going to assume you are familiar with ProxmoxVE or setting up Active Directory, so some of this might be review.
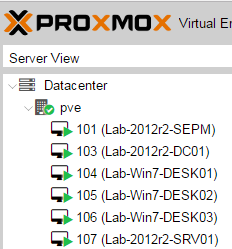
You will configure at least 2 virtual machines, most likely more:

You will create a Windows 2012r2 domain, promote one server to be a DC, and add additional hosts to the domain:

You will create at least 2 users and 1 administrator account:

To get started, you really only need a Domain Controller and a Workstation. To be able to test out more stuff, you'll probably end up wanting at least two workstations (User 1's workstation and User 2's workstation), and at least one more non DC server.
Example server specs
I'm including my server specs just as a reference point. I've found it really helpful in the past when people have done the same:2013 configuration
CPU: AMD FX-Series 8-Core (Circa 2013)
SSD: 512 GB SSD
Memory: 16GB DDR3
If you are building on consumer hardware like I did, I suggest just going right to 1TB of SSD and 32GB of RAM. I know it isn't cheap, but with only 500GB SSD and 16GB RAM I ran up against those limits pretty quickly.
In Pentest Home Lab - 0x0 - Building a virtual corporate domain, I touch on a few other options as well, for instance: Rather than using consumer hardware and an expensive 1Tb SSD, you can buy used enterprise grade stuff on ebay, which often comes with tons of storage and memory. This is what my friend @mikehacksthings does, who is also the one who introduced me to ProxmoxVE.
Of course, there are many ways to do this, so here are more great resources that talk about some of the different hardware options:
If you have a firewall or a router at home you can absolutely place your hypervisor on its own network and control access between your lab and your home network. This is what I am doing now. I have my home network somewhere on 192.168 and I have my lab on 10.0.0.0/24
Another note: I suggest that you use bridged mode for all virtual machines. You can do almost everything you want to do with NAT, but that means you won't be able to run tools against your lab unless they are being run from other virtual machines in the lab's private network.
1) Download the ISO
3) Boot your physical server into the install ISO
4) Select Install Proxmox VE
2017 configuration
CPU: AMD FX-Series 8-Core (Circa 2013)
SSD: 1TB SSD (Samsung 850 EVO 1TB 2.5-Inch SATA III Internal)
CPU: AMD FX-Series 8-Core (Circa 2013)
SSD: 1TB SSD (Samsung 850 EVO 1TB 2.5-Inch SATA III Internal)
Memory: 32GB DDR3
In Pentest Home Lab - 0x0 - Building a virtual corporate domain, I touch on a few other options as well, for instance: Rather than using consumer hardware and an expensive 1Tb SSD, you can buy used enterprise grade stuff on ebay, which often comes with tons of storage and memory. This is what my friend @mikehacksthings does, who is also the one who introduced me to ProxmoxVE.
Of course, there are many ways to do this, so here are more great resources that talk about some of the different hardware options:
Home Lab Design by Carlos Perez
My new home lab setup by Carlos Perez
Building an Effective Active Directory Lab Environment for Testing by Sean Metcalf
Intel NUC Super Server by Mubix
My new home lab setup by Carlos Perez
Building an Effective Active Directory Lab Environment for Testing by Sean Metcalf
Intel NUC Super Server by Mubix
Let's talk about network placement
You can get really fancy and run your lab in a restricted subnet, or you can just keep it simple and run it on the same flat network you use for everything else on your home network. You do not need to separate your lab from your home network. In other words, don't let network architecture stop you from setting up your lab. I've made that mistake before.If you have a firewall or a router at home you can absolutely place your hypervisor on its own network and control access between your lab and your home network. This is what I am doing now. I have my home network somewhere on 192.168 and I have my lab on 10.0.0.0/24
Another note: I suggest that you use bridged mode for all virtual machines. You can do almost everything you want to do with NAT, but that means you won't be able to run tools against your lab unless they are being run from other virtual machines in the lab's private network.
Installing the hypervisor (Proxmox VE)
If you have a favorite hypervisor and don't want to try Proxmox VE, you can just skip this section.- https://www.proxmox.com/en/downloads
- I went with Proxmox VE 4.4
3) Boot your physical server into the install ISO
4) Select Install Proxmox VE

5) Select I agree
6) Pick harddisk and select Next
7) Select Country, Time zone, and Keyboard Layout and select Next
8) Select a password and enter your email address (I have not gotten any email from them)
9) Configure management network interface and select Next

10) Select Next. This will begin the install
11) Click Reboot
12) At the console, you should see something like this:

13) Log into the console and update the OS:
- apt-get update && apt-get -y upgrade
15) Navigate to the IP you gave your PVE (https://IP:8006)
16) Log in to web interface with username: root (and the password you specified at install)

17) SSH to the server - just to make sure you can

For this post, I'll walk through the proccess of obtaining an Evaluation License. If you already have licensed copies of windows you can skip the next section:
1) Go here: https://www.microsoft.com/en-us/evalcenter/
2) Click the Evaluations square
3) Sign in with your Microsoft account. An old Hotmail account and/or a current outlook.com account should work
4) Click the Evaluations square again
Troubleshooting tip: I was initially unable to reach my newly installed proxmox. It turns out that the default bridge was set up for eth0, but I was cabled into eth1. My eth1 is a better NIC, so rather than change the cable, I modified /etc/network/interfaces and switched the bridge from eth0 to eth1:

Getting Windows server software
If you are going to build on premises, you will need to get your hands on the following software:
- Required - Windows Server (2012 or 2016)
- Optional - Windows 7 (or 8 or 10)
In terms of getting the software, there are a few options:
- Download evaluation versions, which are good for 180 days
- See if your workplace has a key/iso that can be used in a lab environment
- I think if you are a student you can get the OS's for free
Obtaining an evaluation license for Windows server
For my last AWS walk though, I built the AD lab on Windows Server 2016. For this post, to change it up, I'm going to use Windows Server 2012r2. If you want to use Server 2016, almost all of the steps should be the same.
2) Click the Evaluations square
3) Sign in with your Microsoft account. An old Hotmail account and/or a current outlook.com account should work
4) Click the Evaluations square again

5) Select the product you would like to evaluate (Windows Server 2012r2)

6) Select Register to continue

7) Enter your info

8) Select ISO
9) Select 64 bit and your language
10) Select Download
10) Select Download
Downloading Windows 10 ISO
I'll walk through downloading the windows 10 ISO, but as I mentioned earlier, you can skip windows 10 and use Windows7/8 instead.1) Click this link: https://www.microsoft.com/en-us/software-download/windows10
2) Click Download tool now

3) Run the tool
4) Click Accept

5) Click Create installation media

6) Click Next
7) Stick with defaults and click Next

8) Click ISO file
9) Save the ISO (The default filename is windows.iso. I suggest renaming it to Win10Eval.iso or something)
Transfering ISOs to Proxmox
You can either configure a network share for proxmox, or just drop ISO's in the right directory. The easiest way to do it is to SCP your ISO's to /var/lib/vz/template/iso/VM #1: Creating our Server 2012r2 Template
For our first VM, let's go with Windows Server 2012r2. We will configure the VM, install the OS, convert our VM to a template, and then use that template to deploy two VMs for our lab.
Configuring a Promox VM (Windows Server 2012r2)
1) Log into the proxmox web interface2) At the top right, click Create VM

4) OS: Select your OS (Microsoft Windows 8.x/Server 2012r2) and click next
5) Storage: Select local, and then your transferred ISOs should show up in that list. Select the correct windows server 2012 ISO and click next

6) Hard Disk: Click next
7) CPU: Click next
8) Memory: I liked to select Automatically allocate memory within this range, and for Windows I tell it to stay between 1 and 4GB. You can certainly tweak these based on how much RAM you have. 9) Click next

10) Network: Keep defaults (Bridged mode), and click next
11) Click finish
12) In the right side column, find and right click the newly created instance. Click start
13) One column over, click Console
At this point, we are just installing Windows Server 2012r2 as we would normally. I'm going to keep it simple with some bulleted instructions and some commentary, but if you are looking for a similar post that has some nice looking pictures to go with these steps, check out the following series (Parts 1-3): https://www.psattack.com/articles/20160718/setting-up-an-active-directory-lab-part-1/
Time/Sanity Saving Tip: I used to spend hours updating all of my virtual machines before I would make a snapshot or template, but eventually I realized that it was mostly a waste of time. Sure, there are a few times where you do want to test your tools against a fully patched box. But, if this is your first pentest lab, I suggest learning from my hours of wasted time and skipping the patches until you need them. This applies to both the servers and the desktops.
Installing Windows Server 2012r2
1) If using local virtualization (not cloud based), give it 24-32GB of HD space and 1-2GB of RAM. 2) Attach the ISO, boot up the virtual machine, and use this as a guide:
4) Click Install Now
5) Select Windows Server 2012 R2 Standard (server with a GUI)
6)Accept the license terms and click Next
7) Select Custom - New Installation
8) Highlight Drive0 unallocated space
9) Click Next
10) Create an admin password. Use something you don't mind other people seeing, as you might share stuff from this lab one day ;)
11) Use the proxmox shortcut icon to enter Ctrl+Alt+Delete, and log in:

13) Do anything else you need to do on this VM before you convert it to a template. For instance, if you are not using a Eval license, you will want to run sysprep on the VM before you turn it into a template.
Converting a VM to a template in Proxmox
1) Shut down and power off your VM
2) On the left hand bar, right click on your Windows2012r2 VM and select Convert to template
3) Click Yes at the confirmation page. Note: It will take a few minutes for the template to show up. You might see it more quickly if you refresh the proxmox page.
4) That's it. You are ready to launch VMs from the template by right clicking on the template and selecting clone
VM #2 - Creating your 2012r2 Domain Controller
Creating a new VM by cloning your template
1) On the first tab of the Clone wizard, you will be asked if you would like to create a linked clone or a full clone. Linked clones are great, but that means you can never get rid of your template, so just be mindful of that. I don't like using linked clones when cloning one live VM into another, because it is hard to keep track. But with templates, I use them, because it is easier for me to make sure I never touch my templates. This is another reason why a 1TB drive is really nice.
2) Right click on your template and select Clone
2) Right click on your template and select Clone
3) Name the first clone in the wizard (This will be your DC), and click clone

4) Start DC01
5) Assign a static IP. This is especially important for your DC. It doesn't matter if you chose NAT or bridged mode, but in either case, you will want a static IP in that range for your DC.
- Right click on network icon on bottom right and click Network and Sharing
- Click Ethernet
- Properties
- IPv4
- Properties
- Click the folder on the launch bar
- Right click This PC on the left side
- Properties, Change settings
- Change
- Change the computer name
- Reboot
Promoting your first server to a DC
1) Take a snapshot just in case you mess up :). Trust me, do it!- To take a snapshot in Proxmox, Select your VM, switch from Console to Snapshot on the second left most bar, and click Take Snapshot.
3) Next, Next, Next
4) Select Active Directory Domain Services
5) Select Add Features
6) Select DNS Server
7) Select Add Features
8) Next, Next, Next, Next
9) Select Restart the destination server automatically if required
10) Yes, Install, Close
11) In server manager, you will see a yellow caution triangle. Click it,
12) Click promote this server to a domain controller
13) Add new forest
14) Name your domain: you can do lab.local for now, or you can make room for more domains in the future with something like lab.proxmox.local.
15) Click Next
16) Create and record the DSRM password
17) Click Next (ignore warning), Next, Next, Next, Install
18) You will see: You are about to be signed out.
19) Click close (or just hang tight)
You now have an Active Directory Domain - Add some users
I'm going to walk you through adding a bunch of users, and how to make one of those users a domain administrator. I am not going to cover setting up OU's in this post. If you are interested doing that now, take a look at this awesome post from Jared Haight: Setting up an Active Directory Lab - Part 3
- Within server manager, which should have just popped up, click tools at the top right and select active directory users and computers
- Double click on your domain to expand it
- Right click on users and add new user
- Name your users however you want, but I like to keep it simple:
- First: User
- Last: 1
- Login name: user1
- Next
- Enter an easy to remember/crack password
- Uncheck user must change at next login
- Check password never expires
- Next
- Finish
- Repeat for user2
- Then I suggest adding some user accounts that you will use as admins. You can go with user1-admin, or even just a simple admin1, admin2
Add at least one admin user to your domain admins group
- Within Active Directory Users and Computers, Double click Domain Admins
- Click Members
- Click Add
- Start typing a username of your admin user and click check names
- Click OK
- Click OK
VM #3: Creating your second 2012r2 server
This VM is optional, but the beauty of using a hypervisor on dedicated hardware is that you most likely have memory and storage space to spare.
1) Repeat steps 1 and 2 on VM2, but this time name it something like SRV01:

2) Start the server and add it to the domain
Configuring DNS
To add any machine to the domain, the one thing you NEED to do is set the domain controller as the primary DNS server.1) RDP to server
2) Right click on the networking icon at the bottom left and click Open Network and Sharing Center
3) Select Ethernet Adapter
4) Change the primary DNS server to be the IP address of your DC
Adding host to the domain
While this process is fairly straightforward, I feel like it never works the first time for me. If you run into issues, read the notes right after these steps for ideas.1) Select the folder icon in the task bar
2) Right click This PC
3) Click Properties
4) Under Computer name, domain, and workgroup settings, click Change settings
5) Click Change
6) Give your machine a better hostname: Workstation01
7) Switch from Workgroup to Domain and specify the domain. For example, aws.local
8) Click OK
9) Enter Domain Admin credentials. Go ahead and use Admin1's credentials.
10) Once your machine has been added, click OK twice
11) Close the window, and go ahead and Restart Now
12) Repeat this for all servers
Having trouble adding your host to the domain? Here are some troubleshooting tips:
1) Can you ping the IP address of your DC from your other server(s)?
2) Can you resolve the hostname of your DC from your other server(s)?
3) Can you navigate to \\IP_ADDRESS_OF_DC from your other server(s)?
Here are things to look for:
Network Config Settings
--- Did you give your DC the right subnet mask when you configured the static IP?
--- Did you configure the primary DNS server properly on your non-DC host?
Are you typing in the right domain name when attempting to add your host?
Adding domain users to the remote desktop group
You might not ever even need to RDP to your hosts because the proxmox console is pretty good. I still like to do this anyway though.
1) Select the folder icon in the task bar
2) Right click This PC
3) Click Properties
4) On the left, click Remote Settings, and enter the domain administrator credentials
5) In the Remote Desktop section of the window, click Select Users...
6) Click Add...
7) Type Domain users and click Check Names
8) Click OK, OK, OK
You should now be able to RDP to this host with any of your domain users (User1, User2, Admin1)
VM #4: Creating our Windows 10 Template
Everything you need to configure a Windows 10 VM and add it to the domain should is shown above in one way or another. Here is the high level approach:
1) Create the Windows10 VM
2) Install Windows10 using the ISO we downloaded earlier
3) Configure the OS with any custom configurations or software before turning it into a template
4) Turn VM#4, this VM, into a template
VM #5 & #6: Creating two Windows 10 VMs from the template
1) Clone the template to be one Windows10 VM at minimum, but feel free to use 2 or 3 VMs
2) Configure DNS to point to domain controller
3) Configure host name
4) Add VM to the domain
5) Enable file and printer sharing
6) Add domain users to the Remote Desktop group
5) Enable file and printer sharing
6) Add domain users to the Remote Desktop group
Wrap Up
You did it! You should now have 1 DC, and 1-3 additional hosts set up in ProxmoxVE. You are now ready to try all sorts of stuff, like CrackMapExec, Empire, Metasploit, Mimikatz, Kerberoasting, and more. My next posts will walk through running these tools against your active directory pentest lab.
Are there any specific tools or techniques related to penetration active directory you would like me to cover? If so, leave a comment! If I know how to do it, I'll cover it. If I don't, I'll try to learn it and then I'll cover it!
Are there any specific tools or techniques related to penetration active directory you would like me to cover? If so, leave a comment! If I know how to do it, I'll cover it. If I don't, I'll try to learn it and then I'll cover it!


Comments