Pentest Home Lab - 0x1 - Building Your AD Lab on AWS
In Pentest Home Lab - 0x0 - Building a virtual corporate domain, we talked about why you would want to build your own AD pentest lab, where you can build it (cloud vs on-premises options), and the pros and cons of each option.
This post covers building your lab on AWS. Even if you have a lab at home, setting up a small second home lab on AWS is a worthwhile exercise. You'll learn a lot about AWS in the process.

You will create at least 2 users and 1 administrator account:

Note: If you missed my last post, I mentioned that AWS does not provide an AMI (AMIs are like images) for Windows 7/8/10. I also mentioned that while not a true replica of what we run into on the job, I have found that you can just treat servers as if they were clients, and it is good enough. In other words, you have everything you need to simulate a compromised victim's workstation for the purposes of our testing with Windows Server 2012/2016. So for our AWS lab, our workstations will just be additional Windows 2016 servers.
One last thing. To understand/estimate what your AWS lab will cost you, check out the AWS Math section in my last post: Pentest Home Lab - 0x0 - Building a virtual corporate domain.
To summarize:
Some numbers:
1) If you have not already, Create an AWS account
2) Once your account is created, log into the AWS Console
3) Once you log in, under Compute, click EC2


5) Find Microsoft Windows Server 2016 Base and click Select

6) Pick t2.micro (or any other size)

7) Click Next: Configure Instance Details


11) Click Review and Launch, then Launch

14) Let's go see our new instance. Go to Services > EC2


17) While it finishes initializing, find the instance's public IP. You can find it to the right under IPv4 public IP, or in the lower frame, in the description tab, under IPv4 Public IP.

18) Select your instance and click Connect

19) Download the RDP file, and point the window to your private key so you can decrypt the random password AWS gave your Windows instance. Once you decrypt that password, save it somewhere safe, like in a password vault (i.e., Keypass, PasswordSafe).

1) Go back to EC2 dashboard

3) Click Launch

4) Select same keypair you created last time, and click Launch Instances
 5) When it is fully running, download the RDP file again and decrypt the password


2) Click the Ethernet adapter

3) Use Powershell to find the current IP, netmask, and gateway. Set the static configuration to match.


2) The rest should be familiar:


3) Next, Next, Next

8) In the wizard, select Add new forest, and give it a root domain name: aws.local
1) Can you ping the IP address of your DC from your other server(s)?
2) Can you resolve the hostname of your DC from your other server(s)?
3) Can you navigate to \\IP_ADDRESS_OF_DC from your other server(s)?
Here are things to look for:
AWS Security Groups - Make sure you didn't mess up your security group.
--- Did you choose All TCP instead of All traffic?
--- Did you use the wrong subnet mask for your source (or use the wrong subnet altogether)?
This post covers building your lab on AWS. Even if you have a lab at home, setting up a small second home lab on AWS is a worthwhile exercise. You'll learn a lot about AWS in the process.
The series so far:
Table of Contents
- What are we going to build?
- Creating your AWS instances
- Instance #1: This will be the Domain Controller
- Instance #2: This will be Workstation01
- Disable IE Enhanced Security Configuration
- Instances #3 & #4 (Optional)
- Create security groups so that your LAN hosts can talk to each other
- Creating the Domain
- Setting up WindowsServer2016-1 to be a Domain Controller
- Configure a static IP (Required)
- Change the hostname (Optional)
- Promote the server to a Domain Controller
- You now have an Active Directory Domain - Add some users
- Add at least one admin user to your domain admins group
- The Homestretch - Add all hosts to the domain
- Configure DNS
- Add hosts to the domain
- Add domain users to the remote desktop group
What are we going to build?
At the end of this post, you will have a fully functional AD environment in AWS that you can use to make yourself a better penetration tester. I'm not going to assume you are familiar with AWS or setting up Active Directory, so some of this might be review.
You will configure 2-4 AWS EC2 instances:

You will create a Windows 2016 domain, promote one server to be a DC, and add additional hosts to the domain:

You will create at least 2 users and 1 administrator account:

To get started, you really only need a Domain Controller and a Workstation. To be able to test out more stuff, you'll probably end up wanting at least two workstations (User 1's workstation and User 2's workstation), and at least one more non DC server.
Note: If you missed my last post, I mentioned that AWS does not provide an AMI (AMIs are like images) for Windows 7/8/10. I also mentioned that while not a true replica of what we run into on the job, I have found that you can just treat servers as if they were clients, and it is good enough. In other words, you have everything you need to simulate a compromised victim's workstation for the purposes of our testing with Windows Server 2012/2016. So for our AWS lab, our workstations will just be additional Windows 2016 servers.
One last thing. To understand/estimate what your AWS lab will cost you, check out the AWS Math section in my last post: Pentest Home Lab - 0x0 - Building a virtual corporate domain.
To summarize:
- EC2: You pay for EC2 instances only for the hours that the instance is running
- EBS: You pay for EBS volumes from the time they are provisioned to the time they are removed. This means that even if you don't use your lab for the entire month, you will still get charged for the provisioned EBS space.
Some numbers:
- 2 Windows instances, 1 Kali instance, used 30 hours/month on average
- Monthly EC2 Cost: $1.38/month
- Monthly EBS Cost: $8/month
- Monthly Total: $9.38/month
- Annual Total: $112
- 4 Windows instances, 1 Kali instance, used 30 hours/month on average
- Monthly EC2 Cost: $2.36
- Monthly EBS Cost: $14
- Monthly Total: $16.36
- Annual Total: $196
Creating your AWS instances
Instance #1: This will be the Domain Controller
2) Once your account is created, log into the AWS Console
3) Once you log in, under Compute, click EC2
4) Under Create Instance, click Launch Instance

5) Find Microsoft Windows Server 2016 Base and click Select

6) Pick t2.micro (or any other size)

7) Click Next: Configure Instance Details

8) Accept defaults and click Next: Add Storage (Or if you are more familiar with AWS, feel free to create a new VPC or a new subnet for this lab)

9) Accept defaults and click Next: Add Tags

10) Accept defaults and click Next: Configure Security Group
Time to configure your security group. If you are unfamiliar with security groups, but familiar with traditional firewalls, think about it like this: A security group is like a firewall rule and you apply as many rules as you want to each AWS instance. The combination of applied rules is kind of like your per instance firewall policy.
For your lab, I suggest you limit RDP access to your public ISP assigned address (if you are doing this at work, I suggest using a VPN to connect to your lab). The cool thing is that if this changes, you can just log into the AWS console from anywhere and change the IP in the security group.

11) Click Review and Launch, then Launch
12) If you haven't created an AWS keypair yet, create one. If you have, you know what to do here.
13) Launch Instance

14) Let's go see our new instance. Go to Services > EC2

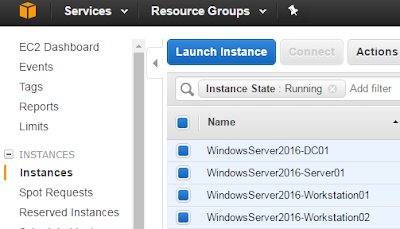
15) You will now see a new running instance. Click the Running Instances link

16) Your new instance will say Initializing under Status Checks. It is a good idea to rename it.

17) While it finishes initializing, find the instance's public IP. You can find it to the right under IPv4 public IP, or in the lower frame, in the description tab, under IPv4 Public IP.

18) Select your instance and click Connect

19) Download the RDP file, and point the window to your private key so you can decrypt the random password AWS gave your Windows instance. Once you decrypt that password, save it somewhere safe, like in a password vault (i.e., Keypass, PasswordSafe).
20) Double click the AWS RDP file, or just put the public IP in RDP manually and choose Administrator as the username
21) Enter the decrypted password
22) You are now logged into your first server.

Instance #2: This will be Workstation01
There is a really cool feature within the EC2 console called "Launch More Like This". This launches the EC2 instance wizard and uses the same EC2 settings as the selected instance, such as security groups, sizing preferences, desired subnet, etc. But, this is NOT like cloning a VM. Everything inside the container is going to be vanilla.
2) Click on Windows Server 2016-1 and click Actions, Launch more like this.

3) Click Launch

4) Select same keypair you created last time, and click Launch Instances

6) Double click the AWS RDP file, or just put the public IP in RDP manually and choose Administrator as the username
7) Enter the decrypted password
8) You are now logged into your second machine
Disable IE Enhanced Security Configuration
This will make IE act more like Windows10, specifically it will not require you to add every new site to the Trusted Sites list.
1) Open Server Manager

2) Click Local Server
3) In Properties, navigate to IE Enhanced Security Configuration, and click On
4) Change both options to Off, and click OK

5) Restart IE
Instances #3 & #4?
You can either stop here and you'll have:
WindowsServer2016-1 - This will be your DC
WindowsServer2016-2 - This will be your workstation
Or, you can make two more servers and you will have:
WindowsServer2016-1 - This will be your DC
WindowsServer2016-2 - This will be user 1's workstation
WindowsServer2016-3 - This will be server1
WindowsServer2016-4 - This will be user 2's workstation
Create security groups so your LAN can talk to each other
Now that we have spun up all of our servers and have successfully RDP'd to each of them, there is one more thing we need to do before we can create our domain. We need to create an AWS Security Group that allows the hosts on your subnet to talk to each other.
1) On the left navigation bar under Network & Security, select Security Groups, Click Create Security Group
2) Name it, allow all traffic inbound from your subnet. You can leave the outbound tab as is. The default is to allow all outbound traffic.

3) Click Create
4) Now we need to apply this security group to all of our Lab instances
5) Go to the EC2 view, click Actions, navigate to Networking, and select Change Security Groups

6) Select the new security group *in addition* to the RDP security group you already have selected

7) Click Assign Security Groups
8) Repeat this for ALL Lab instances
Creating the Domain
Setting up WindowsServer2016-1 to be a Domain Controller
There are a few things you'll need to do and some you might want to do before creating your domain and promoting your first server to a domain controller.
Configure a Static IP (Required)
The first thing you want to do is change your private IP from dynamic to static. The private IP address that AWS gives your instance "remains associated with the network interface when the instance is stopped and restarted, and is released when the instance is terminated." So while this address will not change, it is still dynamic as far as your instance is concerned, and will not pass a "promotion to DC" prerequisite check in Server 2016. There might be a better way to do this, but for me, all I did was configure the instance with a static address and I used the AWS assigned dynamic address as the IP address.
1) If you are new to Server 2012/2016, you get to this by right clicking on the networking icon at the bottom left and click Open Network and Sharing Center
2) Click the Ethernet adapter

3) Use Powershell to find the current IP, netmask, and gateway. Set the static configuration to match.

Change the Hostname (Optional)
The next thing you might want to do, and this is optional, is to change the hostname to something like AWS-DC01.
1) If you are new to Server 2012/2016, click the folder icon in the task bar, right click This PC, and click properties

2) The rest should be familiar:

3) You will have to reboot at this point. Give it a few minutes and log back in.
Promote the server to a Domain Controller
Now let's finally make it a DC.
1) Open Server Manager
2) Click Manage, Add Roles and Features

3) Next, Next, Next
4) Select Active Directory Domain Services, then click Add Features
5) Select DNS Server, then click Add Features
6) Next, Next, Next, Install, Close
7) In Server Manager, click the yellow triangle and click Promote this server to a domain controller

8) In the wizard, select Add new forest, and give it a root domain name: aws.local
9) Give it a restore password and drop that in your password manager
10) Next, Next, Next, Next, Next, Install
11) When it is done, click close (or just wait and it will reboot)
12) Give it a minute and connect back. Once you connect, it will take a few minutes to fully install.
You now have an Active Directory Domain - Add some users
I'm going to walk you through adding a bunch of users, and how to make one of those users a domain administrator. I am not going to cover setting up OU's in this post. If you are interested doing that now, take a look at this awesome post from Jared Haight: Setting up an Active Directory Lab - Part 3
1) Within server manager, click tools at the top right and select active directory users and computers
2) Double click on your domain to expand it (either on the left or the right frame)
3) Right click on users and add New > User
4) Name your users however you want, but I like to keep it simple:
- First: User
- Last: 1
- Login name: user1
- Click Next
- Enter an easy to crack password
- Uncheck user must change at next login
- Check password never expires
- Next
- Finish
Add at least one admin user to your domain admins group
1) Within Active Directory Users and Computers, Double click Domain Admins
2) Click Members
3) Click Add
4) Start typing a username of your admin user and click check names
5) Click OK, OK
The Homestretch - Add all hosts to the domain
Configure DNS
To add a machine to the domain, the one thing you NEED to do is set the domain controller as the primary DNS server.
1) RDP to server
2) Right click on the networking icon at the bottom left and click Open Network and Sharing Center
3) Select Ethernet Adapter
4) Change the primary DNS server to be the IP address of your DC
Add host to the domain
While this process is fairly straightforward, I feel like it never works the first time for me. If you run into issues, read the notes right after these steps for ideas.
1) Select the folder icon in the task bar
2) Right click This PC
3) Click Properties
4) Under Computer name, domain, and workgroup settings, click Change settings
5) Click Change
6) Give your machine a better hostname: Workstation01
7) Switch from Workgroup to Domain and specify the domain. For example, aws.local
8) Click OK
9) Enter Domain Admin credentials. Go ahead and use Admin1's credentials.
10) Once your machine has been added, click OK twice
11) Close the window, and go ahead and Restart Now
12) Repeat this for all servers
Having trouble adding your host to the domain? Here are some troubleshooting tips:
2) Can you resolve the hostname of your DC from your other server(s)?
3) Can you navigate to \\IP_ADDRESS_OF_DC from your other server(s)?
Here are things to look for:
AWS Security Groups - Make sure you didn't mess up your security group.
--- Did you choose All TCP instead of All traffic?
--- Did you use the wrong subnet mask for your source (or use the wrong subnet altogether)?
Network Config Settings
--- Did you give your DC the right subnet mask when you configured the static IP?
--- Did you configure the primary DNS server properly on your non-DC host?
--- Did you give your DC the right subnet mask when you configured the static IP?
--- Did you configure the primary DNS server properly on your non-DC host?
Are you typing in the right domain name when attempting to add your host?
Feedback, suggestions, corrections, and questions are welcome!
Add domain users to the remote desktop group
1) Select the folder icon in the task bar
2) Right click This PC
3) Click Properties
4) On the left, click Remote Settings, and enter the domain administrator credentials
5) In the Remote Desktop section of the window, click Select Users...
6) Click Add...
7) Type Domain users and click Check Names
8) Click OK, OK, OK
You should now be able to RDP to this host with any of your domain users (User1, User2, Admin1)


Comments
Looking forward to read your next post: Pentest Home Lab - 0x2 - Building Your AD Lab on Premises.
Cheers
At some point in the future I'm going to investigate exactly how much you can save by taking snapshots and storing them on s3, in the event you know you are not using the lab for a few months. It still costs money, but less money for sure.
Another option I want to investigate would be to use some of the automation functionality within AWS to completely build a lab without any interaction. Then you can just terminate and rebuild a few months later when you need it again.
https://aws.amazon.com/ebs/pricing/